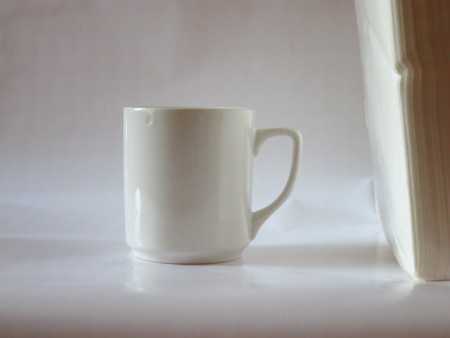
A free and quick way of doing product photos
TL/DR; use daylight, a white surface as reflector, and a sheet of cardboard for a background.
This is a rant. But it is also a tutorial. A rantorial if you wish.
Let me say upfront that if you are serious about product photography, this is not for you. Spend a little more money (say 50 euro) and a little more time (say five minutes) to get product photos that are 200% better. For instance read Strobist’s How To: DIY $10 Macro Photo Studio. (You have a 50% chance that four years from now that link won’t work–if so, just Google something like ‘product photography cheap’ without the quotes, and hundreds of articles and videos will pop up that explain more or less the same thing.)
On with the rant portion of this posting. The other day I was looking for a photo of a 3D printed object that I could use on my other blog, but almost all I found were lousy pics of geeks holding up ill defined objects in their badly lit workshops. OK, so I am bad at ranting: curses! How could they?! Don’t they understand a blogger’s plight?
What I am trying to say is that with an investment of two minutes, it is possible to get better product shots (what photos of things are generally called when the goal is to show off said things). Here is how.
1. Use daylight. This produces a nice, natural light.

2. Use a reflector opposite the natural light source. In my example I used a pack of IKEA napkins opposite the window.

The result is that the object will be more evenly lit.
Real photographers call these things ‘light modifiers’, but then again real photographers will use white umbrellas and pay 30 bucks for them. I find that IKEA napkins aren’t just a lot cheaper, they can also be used as napkins after their career in photography.
3. Use a background.

I used a roll of wrapping paper here, but in the past I have also used a wool vest and a piece of white cloth I had lying around.
4. Crop.
In this case you want the subject to have the viewer’s sole attention, so crop the picture until you just have a foreground and a background.

5. Forget (almost) everything I just said.
None of this means anything. In general you want your photos to tell a story. The 3D printer geeks holding up their creations in their night-time workshops weren’t just showing the object they had made, they were also telling something about how that object got into being. A mug with bookcases as a backdrop? That can actually be a lot more interesting than a mug against a plain background.
However, you need to work that story and consequently work that photo. Rearrange the books so that the background looks interesting. Make sure the foreground doesn’t blend into the background. Make sure the objects in the photo belong together. Make sure the background isn’t more attention grabbing than the foreground. Still use light modifiers. Et cetera.
So the real rantorial is that if you cannot be bothered to put some time into making a photo, why bother making the photo at all? If you’re doing a lot of product shots, do it right and get yourself a little studio. You don’t even have to follow the link to Strobist and put all that DIY into it; just order one for fifty bucks off the internet. I know that Conrad sells ready made product studios, for example. The background in my photo looks a bit crinkly because wrapping paper is thin and crinkles easily.
My technique is only useful for when you are in the middle of nowhere, you need to send photos over your satellite phone and need to get the best shots you can with almost no tools at your disposal.
Still, my rantorial at least shows which techniques can make a product photo look better, so I hope it was useful in that respect.
Leave a Reply